Why You Should Be Using a TpT Wishlist

Utilizing my wish list is my favorite way to shop on Teachers Pay Teachers, especially during sale time. I'm always worried that I will forget to buy something that I want, especially a big bundle or a higher-priced item. Between sales, I always see things that I would like to buy but don't need right then, so I add them to my wish list.

If you haven't taken advantage of your wish list, it's very simple to do.

To add items to your wish list, make sure that you are signed into your account and click the +WISH LIST under the price of the item you want to add. That's it!
When sale time comes around, I start off by going to my wish list and removing anything that I no longer want or need. That way my wish list stays decluttered and manageable. For example, this fall I am moving from the 5th grade classroom to the library, so there are many things that I can remove.
Then I go through my list and think about which items I want to buy during the sale. Since there is one sitewide sale per quarter, I only buy what I will need before the next sale. That way, if I change my mind about something, then I didn't spend that money unnecessarily. So for the BTS sale, I'm only looking at decor, year-round bundles, organization tools, and other back-to-school necessities. I go ahead and add what I plan to purchase to my cart by clicking the "Move to cart" button.
This process makes sale day really smooth. All I do on the sale day is double-check that the items in my cart have the SALE tag and are currently on sale. If they are not, I move them back to my wish list unless I REALLY need them.
After making my purchases, I download them onto my thumb drive. I really went back and forth about storing the files on my computer, on Google Drive, or on something external. I decided on a thumb drive for a few reasons.
Reason 1 - It's easier to access files on Google Drive or a thumb drive when you have a school computer and a home computer. Plus, the files don't take up space on your hard drive.
Reason 2 - You still have to download the file to your computer before you can upload it to Google Drive. (Well, unless you have figured out how to get your Google Drive folder to appear on your desktop...) You can download directly to a thumb drive.
Reason 3 - Opening PDF files is fine on Google Drive, but it's a pain to open any Microsoft file (Word, PPT, Excel) directly from Google Drive (unless you have your Drive folder on your desktop).

On my thumb drive, I just have a simple set of folders by area and save to the appropriate one.
One more quick tip. Since TpT authors make it a habit to improve or add to their resources, I go back to the My Purchases page to redownload updated materials. This is the only way to really know about and get the updated material.
I love the sort by Recently Updated feature on the My Purchases page. It saves me a lot of digging around for those updated products. I can also use the search bar for both my paid purchases and free downloads if there is something specific that I'm wanting to find.

If you missed the other posts in this blog hop, {click here} to go back to the beginning!
Before you leave, make sure to enter the giveaway that we are having!

a Rafflecopter giveaway

Book Madness Update

Book Madness: Details for Setup and Implementation
I first learned of the Book Madness Tournament of Books from Catherine at {The Brown Bag Teacher}. After doing with our fifth graders for a few years, I wanted to provide an update to my {previous post} about it.

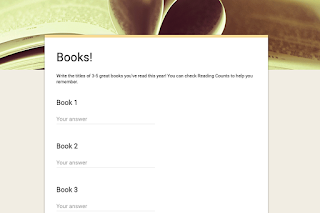
The first step is to generate a list of books on which the students will vote. I like to have student input, but you could also use circulation records or AR test results to get the titles of books your students have read. I really don't know the best way to get this information as I've used Google Forms as well as having students write down 3-5 book titles on a slip of paper. Don't forget your read aloud and literature circle books!
Book Madness: Details for Setup and Implementation - Google nomination form
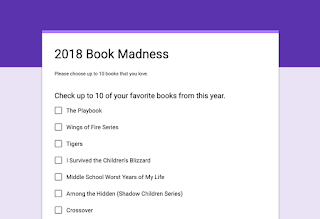
After gathering all of the titles, I list them on a Google Form where students can vote for up to ten. Sometimes I include the series instead of a specific book title.
Book Madness: Details for Setup and Implementation - voting for 16 form
Google Forms will tally the results and then I list the top 16 books in order. Sometimes I might fudge the results a little to prevent both Sisters and Smile being in the group.

There are two different ways I make the brackets, depending on what kinds of books make the top 16. Sometimes I bracket them by genre (which is good if you don't want your final four to all be graphic novels), or sometimes I'll just do a straightforward seeding.
Book Madness: Details for Setup and Implementation - 16-team elimination bracket
I copy and paste the book covers into a PowerPoint and resize them to four to a page.

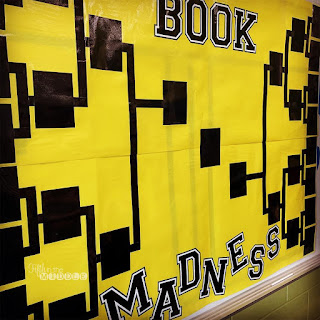
After the first year of cutting and assembling the actual bracket, I decided that I never wanted to do that again! Unfortunately, I had to do a new one the following year anyway. To make this one last, I did some math that ended up being more complicated than I anticipated.
  • Yellow background - Bulletin board paper cut into two pieces so that they will fit though the laminator (measure your school laminator in advance). Mine are 2 feet by 5 feet.
  • Black strips - all are 1" wide
    • 2" (16 for the far left and right)
    • 7" (22 for the rest of the horizontal and some vertical)
    • 12" (8 for the rest of the vertical; the longest vertical ones will be composed of 2 pieces - one on the upper half and one on the lower half)
  • Black place holders - 4" x 5 1/2" (make 31)
  • The font is {Collegiate} at font size 600pt.
After placing the pieces and attaching them to the bulletin board paper, I run both halves separately through the laminator. After hanging them up, I put the placeholder for the winner in the middle.
Book Madness: Details for Setup and Implementation - black placeholder on yellow bulletin board paper
After the 16 are posted, I wait a while so that students have a chance to read some of the ones they haven't read. I created another Google Form for the first round of matchups and shared it through Google Classroom. If they haven't read either of the books in the matchup, they didn't have to vote in that pairing. On my hallway display, I put a sticky note with the number of votes received on each book. This way, they could see the "final score" of each matchup. Repeat until you have a winner!
Book Madness: Details for Setup and Implementation - round of 8 voting
Here are the past few winners. I am retiring Wonder this year since it's usually a slam dunk win (pun intended).
Book Madness: Details for Setup and Implementation - past winners (Wonder, The Maze Runner, and Hatchet)
These are the books that made the cut this year!
Book Madness: Details for Setup and Implementation - covers of 2019 student choices

Book Madness: Details for Setup and Implementation - close-up of student choices

Book Madness: Details for Setup and Implementation - close-up of student choices

Pin for later:
Book Madness: Details for Setup and Implementation


Multiplication Facts Card Game

Multiplication fact card game similar to UNO
This game came out of the realization that I hadn't prepped the original game that I wanted to play during math rotations. As I scoured my cabinets looking for something to do instead, I found my stash of used playing cards from a local casino. (Tip: If you live/work near a casino, ask them if they're willing to donate used decks to your classroom.)

(Another tip: Take different colors of markers and mark the ends of the decks so you can find the home for the inevitably-misplaced card. Make sure you get the color into the grooves.)
Color code deck ends to keep different sets organized
The game is based on UNO. I make groups of three to five students and project the following key for the cards above 10.
Rules for a multiplication fact card game similar to UNO
Students deal out seven cards to each player and turn over the top card on the remaining stack. Play begins when the first student plays a card that matches the suit or number on the upturned card -or- an ace (any suit) or joker. To "mathify" it, students must multiply the number on the stack times the card they are playing. If they are playing a face card, then they multiply by the power of 10 shown on the projected key. For the picture below, the student playing the four of diamonds would multiply four times four to get sixteen.
Multiplication fact card game similar to UNO
Players continue using UNO rules until one person plays his or her last card. Students play in my class for about 15 minutes.

I'm sure I'll think of other ways to build in more math concepts, but students really enjoyed this twist on the classic card game.

Get easy access to all of my free resources and subscribe to my mailing list!

* indicates required


Multiplication fact card game similar to UNO