We are furiously wrapping up our explorers unit because this year our quarter ends at winter break. Probably not the best time to assess...
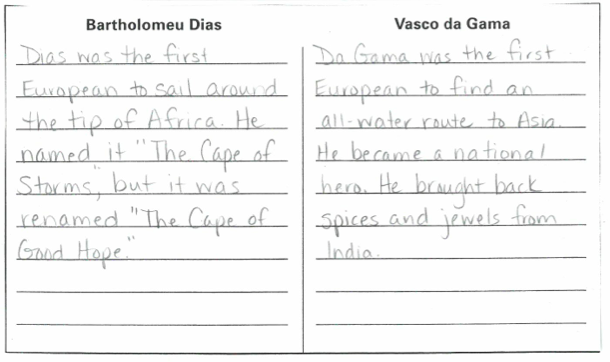
Through our explorers unit, I have been making explorer trading cards for each person that we study. I got the free template from {Ginger Snaps}. I easily added pictures of the explorers that we covered.
Then I did a timeline along my ceiling to show how the clustered during the appropriately-named Age of Exploration.
Back to the trading cards. To assess the students (and pull in some CCSS), I asked them to assign a value to each explorer, much like a sports collector might assign a value to a baseball card. We talked about how baseball cards were valued (rookie card, MVP, great stats, etc.) and talked about how that might translate to explorers. When they assigned a value, they had to give me an explanation on why that decided on that value. As I circulated, I heard some really great conversations about the explorers' contributions to history. I also heard conversations about how they shouldn't be ranked on how attractive they were (I kid you not - every time I handed out a new card, some of the kids would comment about his attractiveness...) or if the students liked them or not (ie. Columbus, Cortes, and Pizarro).
I was very impressed with their focus on this particular project, and I will definitely revisit this assessment next year.
Elf for Hire
Thursday, December 19, 2013
- 3 comments
First of all...
a Rafflecopter giveaway
My students have been having a fun time with Elf for Hire. This is something that I have done in years past, but I like how this is laid out with graphic organizers. Plus, it was free from Teresa Kwant! Click on the image below to download it from TpT.
I modeled how to fill out the graphic organizer. If you use Write Tools like I do, then the opinion would be coded green, the reasons would be yellow, and the evidence would be red. From the graphic organizer, they created a rough draft after I modeled it. Again, I had them highlight the opinion (topic) green, the reasons (big ideas) yellow, and the evidence (details) red. I also had them circle the transition words that they used in their yellow sentences, as well as having them double-check that their yellow sentences were the first sentences of their paragraphs. From that, they typed up their "applications" so they could read them for the class.
Another component was to invent a new toy. Students had a lot of fun coming up with pictures of crazy toys and descriptions of what they did.
I also took pictures of the students so that they could use to "elf" themselves. My coworker actually found these, but I remember seeing them somewhere in the past year or two. If you know the source, please let me know so I can credit them.
With those same pictures, I made identification cards for them to show that they were North Pole "employees". I used the {free clipart} from Krista Walden for the cute hats :) The other graphic is a Googled item, so that's what I can't share the file :(
AMC also has a great variation on this activity with different positions for which the students can apply. Click on the image to see it in her store.
Tried It Tuesday - Vino Van Gogh
Tuesday, December 10, 2013
- 12 comments
This is completely unrelated to what I'm doing in the classroom, but it's totally related to what I'm doing to stay sane this holiday season. I recently saw some of my Facebook friends post about something called Vino van Gogh. The concept is that you go to a local restaurant and learn how to paint a picture while having a glass of wine (or whatever else the restaurant serves).
I attended my first one a few weeks ago, and I had a blast even though I didn't know anyone else there! My favorite painting of all time is van Gogh's Starry Night (I know I'm going out on a limb with that one), and the painting that night was a Christmas tree based on the Starry Night style. So I knew that I had to try it.
All of the materials were provided, and the instructors went through it step-by-step so that everyone would be successful during those two hours. While we were all painting the same thing, no two paintings were alike. I don't have a picture of all of the different variations, so you'll just have to take my word for it.
Here is my finished piece of art:
I have already signed up for two more this month, and I will certainly share those when they're finished. Have you ever tried anything like this in your area?
Also be sure to check out a bunch of holiday freebies at {Minds in Bloom}!
How I Taught Columbus This Year
Tuesday, December 3, 2013
- 1 comment
If you are looking for the scavenger hunt, click {here}.
This year, I decided to focus more on point of view/author's purpose when talking about Columbus. Our reading series spends a lot of time on these skills, and I thought that it would be natural to incorporate the skills into this particular topic. It seems to me that Columbus and Columbus Day has become more controversial in the past few years, so the whole goal of this was to make the students decide... Is Columbus a hero or villain?
First we read about what our old textbooks said about him. We came up with the following list about what we read and inferred from the text.
Then we watched a video about Columbus that was part of the "Animated Hero Classics".
After that, we watched another video based off of the book by Jean Fritz (can you tell that we were near Thanksgiving break?!)
We did a few more resources, including Encounter by Jane Yolen. We did some figurative language and inferring activities with that book.
Finally, I had them write an opinion piece about whether they thought Columbus was a hero or villain with three supporting ideas and two details about each supporting idea. Many students went the villain route, but there were a few that made compelling hero arguments.
Early Exploration Continued
Monday, November 18, 2013
- 1 comment
This will be a hodge-podge post as I find time to write here and there.
I just finished and uploaded (it is currently Thursday) a QR code review that I'm doing with my kids tomorrow. We are about a third of the way through our explorers unit, and I usually do some review and/or a test at this point. After the success of my Native American one, I knew that I had to do this again. This time, I uploaded this particular activity as a freebie. Click below to grab it.
Aaaaaand Monday is here and I still haven't finished this post. Guh.
Anyway, early last week, we studied Prince Henry, Dias (did you know that no two resources seem to spell his name the same way?!), and da Gama. My students always confuse the latter two, so I tried to think of some way to keep them distinct this year. In the past, I've had them color a map and trace the two routes on the map in different colors. Under the flip book, we collectively wrote summaries for each of them.
This year I remembered that the students should be working harder than the teacher, or maybe I was just feeling a little lazy. So the first thing that I did was create this:
We started with filling it out with Ericson and Polo so they could get the hang of it. Then we applied it to Prince Henry, Dias, and da Gama. Prince Henry was a little tricky since he didn't actually sail on an expedition of his own.
THEN, I gave them a half-sheet of paper with key words and several lines. I asked them to write a summary of Dias using the key words somewhere in it. Then they paired with another student and decided which one to use. Then two pairs got together and chose one between them. Then two sets of quads together settled on one. I quickly typed up the three remaining summaries and those became the three choices that they could copy into their flip book. All students handed in their summaries to make them accountable, yet we ended up with three great choices that I didn't have to write myself.
We did the same with da Gama, and our flip book was finally done!
Thanksgiving Ideas
Saturday, November 16, 2013
- 3 comments
Last year, I assigned a turkey in disguise activity. I got the idea from Stephanie at Teaching in Room 6. Students had to disguise a turkey so that it wouldn't be Thanksgiving dinner. Then we wrote persuasive paragraphs stating three reasons that they weren't turkeys. I didn't think to keep copies of the paragraphs, but I still have the pictures of the not-a-turkeys :)
One of the new things that I'm doing this year will be my Thanksgiving Common "Core"ses ELA centers. There are five centers for activities including point of view, Latin and Greek roots, author's purpose, verb tense, and figurative language. Click on the picture to check them out!
Here is a cute little turkey that a student gave my neighbor teacher. It is two rolled up pieces of construction paper with a few handprints attached to the back. I don't have specific instructions, but I'm sure that you crafty teachers can figure it out :)
One of the new things that I'm doing this year will be my Thanksgiving Common "Core"ses ELA centers. There are five centers for activities including point of view, Latin and Greek roots, author's purpose, verb tense, and figurative language. Click on the picture to check them out!
I'm also thinking of trying this cute little class craft with my students. It goes with the book The Night Before Thanksgiving. Each student creates a feather to help disguise the turkey. The pin doesn't go to the source of this picture, so I'm not sure why the original pinner didn't link it to her blog. If you know the original source of this picture, please let me know so I can update the pin.
Mathematical Monday - Volume with Product Boxes
Monday, October 28, 2013
- 5 comments
I happened to walk by this fabulous math project that one of my team members was doing with our kids. With her permission, I'm sharing it with you :) As a side note, I don't have pictures of the process because I discovered this project after-the-fact.
In math class, they have been working on finding the volume of a rectangular prism. Students brought in boxes from various products, such as cereals, mac and cheese, even empty cases of pop. They used interlocking cubes to measure the length, width, and height of the box. Then they found the volume of the box using cubic units as the label. Using grid paper, they traced the dimensions on each side, cut out the box, reproduced the artwork on the sides, and assembled it into a box.
Here is how they ended up! My favorite is the case of Mountain Dew :)
Link up your math ideas!
Subscribe to:
Posts (Atom)