Recycled Chihuly-Inspired Wall Art

Recycled Chihuly-inspired art using water bottles and markers
I'm just fascinated by the work of Dale Chihuly. I think that the first piece of his that I saw was in the lobby of the Bellagio in Vegas.
When I was putzing around Pinterest, I saw some cool projects that others did with coloring plastics to get the Chihuly look. Since I'm also into recycling, I had to figure out how I could do something similar for my classroom.

During testing week, I gave my students single-use water bottles with this project in mind. Our art teacher is collecting caps for a school-wide mural, so we were able to use both parts of the bottle for art.

This is an interesting video that I showed my students prior to the project so that they would know the "look".
Then I divided my permanent markers into a warm color basket and a cool color basket. I told my students that they could do any pattern they chose but only use markers from one basket.

Then we took the bottles and cut off the bottoms along the seam. If you buy the water bottles with the really thin plastic, i.e. the store brand water, then the students should be able to cut the plastic okay. If the plastic is too thick, then you'll have to start it for them. You could reuse the bottoms to make into flowers. My {saved Insta stories} have some of the in-progress shots since I forgot to take actual pictures during that part.

Starting from the bottom, spiral cut the bottle. Thicker spirals create a more rigid shape, which I ended up preferring for a wall installation. If you want to do a chandelier or something hanging from above, you might want a thinner spiral so they're longer.

Next, I took a rectangle of chicken wire and started feeding the bottle openings through the holes. I used hot glue to keep them in place since the chicken wire holes were slightly larger that the bottle openings.
Recycled Chihuly-inspired art using water bottles and markers Recycled Chihuly-inspired art using water bottles and markers
Now this step is optional. Some of the spirals were kind of floppy, so I used a heat gun to make them melt and twist a bit to make them a little more rigid. This is the heat gun I used (affiliate link):
I ended up trimming some of the longer ones and hot-gluing the pieces to fill in holes to make it look more full. The final step was to trim off all of the extra chicken wire and hang it!
Recycled Chihuly-inspired art using water bottles and markers Recycled Chihuly-inspired art using water bottles and markersRecycled Chihuly-inspired art using water bottles and markers

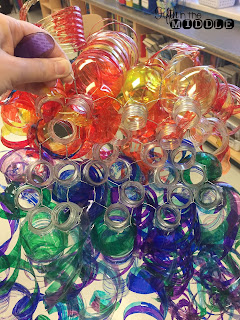
Here's a peek at some suncatchers that we also made by coloring on clear Solo cups and putting them in a 350˚F oven for less than a minute until they just start to collapse. Then I quick pulled them out and used an oven mitt to crush them down the rest of the way. If you leave them in longer, then the clear plastic turns white. (Melting plastic probably isn't the most eco-friendly thing in the world, in retrospect.) Then I hot-glued them to a very thin fishing line to hang in the window.
Recycled Chihuly-inspired art using clear Solo cups and markers
Recycled Chihuly-inspired art using water bottles and markers

Audiobook Groups and Doodling

Free doodle notes for listening to read-alouds or audiobooks
My grade-level partner came up with a new idea to mix up our book groups this spring. We had several Playaways and book CDs available, so we decided to try audiobook groups. (Side note: This is a perfect example why veteran teachers should always be willing to try suggestions of less-experienced teachers. Always keep trying new things!)

I knew that the students would probably need something to do while listening. When I do read-alouds, many of them draw or do other quiet things at their desks. I made a simple page of story element doodles that they used while listening. You can download your copy by clicking the image.
Free doodle notes for listening to read-alouds or audiobooks
We ordered a few things from Amazon (affiliate links) to set these up. First of all, these groups were interest-based, and we knew that we could have groups of up to eight kids. We bought these splitters so that everyone could listen at the same time. Since we were able to chain them together, we could adjust for every group size.
We also decided to let the kids use gel pens to immediately up the buy-in. I decided to only put out a third of them, though. In retrospect, I should have emphasized that they were to DOODLE and DRAW, not COLOR. Many of the pens ran out since some kids were coloring everything.
So now we were ready to listen. Since I had never read any of the books that were chosen, I listened along. I discovered that it was kind of hard for me. I've always been the one reading aloud and having the words in front of me. Or when I'm listening to an audiobook, it's while I'm doing something else. I'm glad that I decided to make the doodle pages because I needed something to do while listening.

While we were listening, the kids tended to watch what I did on my paper since they weren't sure what to do. It didn't take them long to get the idea and soon they were able to add their own thoughts to their papers. Many ended up going onto the back of the paper or onto another blank paper when they ran out of room on the front. Here are the examples of my sheets from the groups:
Free doodle notes for listening to read-alouds or audiobooksFree doodle notes for listening to read-alouds or audiobooks

Free doodle notes for listening to read-alouds or audiobooksFree doodle notes for listening to read-alouds or audiobooks


You are invited to the Inlinkz link party!
Click here to enter

Get easy access to all of my free resources and subscribe to my mailing list!

* indicates required


Free doodle notes for listening to read-alouds or audiobooks