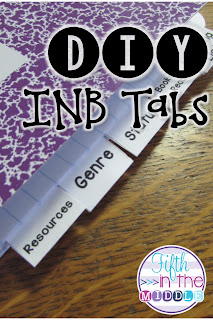
Our reading notebooks are divided into sections instead of having a master table of contents. My coworker had hers divided up with adhesive labels, such as Avery, folded in half to create the tabs. One end of the label was on one side of the paper, and the other end was on the other side of the paper. When it was creased, it extended beyond the edge of the paper to create tabs. Then she wrote on the tabs. Fairly cheap and easy!
Well, my tabs had to be preprinted (of course), so off to the computer I went. I opened a label template in Word (gotta love Avery template 5160!) I highlighted all of the cells and centered them. Then I kept them highlighted and changed the orientation of the text. That's this little guy right here:
Then I chose my font and started typing. I used a font anywhere from 10 to 14 pt, and I left a blank line between the two titles on the label (so it would be labeled on the front and back of the tab).
 |
| This shows 18 labels. |
Students each got a label, and I instructed them to stick on the left end so the the words are on the part hanging off the edge. Then I had them carefully turn the page, make a crease in the blank area between the two titles, then stick down the other side. I don't have a picture of that part of the process, so hopefully you can imagine what that looks like. Then I handed out the next tab and showed them how to stagger them down the side. I will say, some of them are a hot mess. Others got the hang of it and they look quite nice. Either way, they serve their purpose.
After I already set up my teacher reading notebook, I had a thought...
I stumbled upon this on a whim. Bit of space on a lamination sheet + two lonely labels = What if? But you're probably thinking, why in the world would I want to laminate labels?! My plan is to laminate my tabs to make them sturdier and more durable, but I'm sure there are other uses, too. Maybe a small desk name tag or maybe write-on/wipe-off surface on the front of something.
Here's how you do it. Either pre-print your labels or do blank ones if you're doing write-on/wipe-off. Laminate them as usual. Then cut apart the labels. You should be able to peel off the backing, leaving a label with a laminated surface. Then you can fold it in half for a tab or use it as you normally would as a label. Pretty cool, huh?
For more bright ideas from many more bloggers, please browse through the link-up below and choose a topic/grade level that interests you. Thanks for visiting!


Wait....
ReplyDeleteSeriously?
For real?
THAT. IS. AMAZING. I'm going to go laminate some labels just for the joy of it. So excited! THANK YOU!!
Blair
You had me at labels! Great ideas :)
ReplyDeleteWhoa! Laminating labels? That's awesome! Very useful!
ReplyDeleteSarah from Mrs. Jones Teaches :o)
Nice! I like it!
ReplyDeleteLove the idea of laminating them!!! We always just stick them on but this will help them to last FOREVER!!!!!
ReplyDeleteJennifer with Simply Kinder
Brilliant! I can't wait to try it!
ReplyDeleteJoanne
Head Over Heels For Teaching