Test Prep Egg Hunt


We begin our state testing next week, and I just came across this great idea from {Jennifer Findley} that combines test prep with an Easter egg hunt. I knew that I had to do it this week since the timing was perfect.


Materials:
20 multiple choice questions (You can get a copy of mine {here}.)
plastic eggs
recording sheets
clipboards
pencils


Procedure:
1. Cut questions into strips, fold up, and stuff a question in each egg.
2. Have a friendly second grade class hide your eggs on the playground after they finish their recess.
3. Give each student a recording sheet and clipboard.
4. Pair up students.
5. Students find an egg that no one else is using and answer the question inside. Math work can be done on the back of the recording sheet.
6. Students replace the question inside the egg and put the egg back in its hiding location.
7. When everyone has answered most of the questions, each student grabs an egg to bring back inside.
8. Discuss the answers.


Sound like fun? You still have time to try it out! Thanks, Jennifer, for the fun way to practice!


Get easy access to all of my free resources and subscribe to my mailing list!

* indicates required


Students find and answer test questions during an Easter egg hunt.


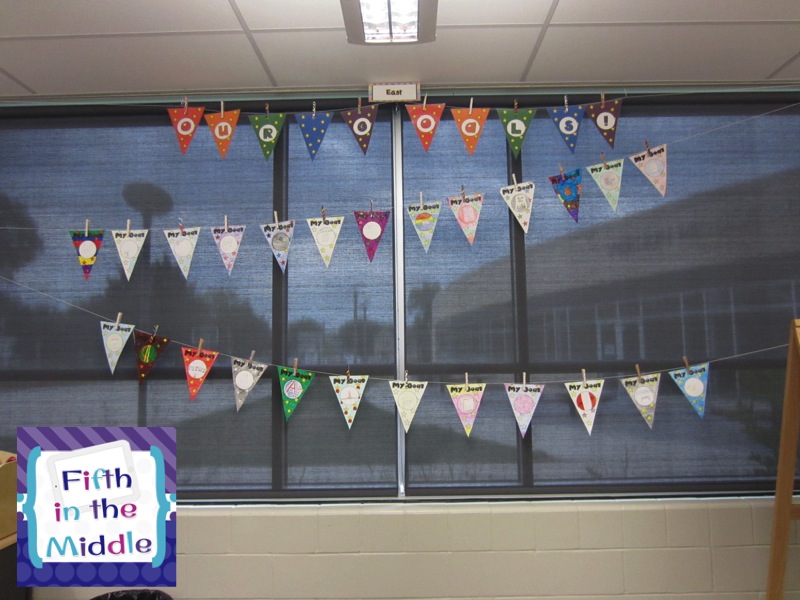
Sparking Student Motivation - Goal Banner

For many of you, testing is happening now or is just around the corner. I know that many teachers also do goal setting with their students before testing begins. Here is a way that I've done goal setting with my students.


On the front, students draw a picture relating to their goals. Here is mine from a few years ago when I wanted had to learn a new reading series.


On the back, there are lines where the students can write about their goals.


You can cut cardstock into pennant-shaped pieces and have them design their own, or you can {purchase the template and main banner at my TpT store}.


I also have a freebie for you to put on your door during testing. {Click here} to download.


Go over to Joanne's blog to find more ideas to motivate students!


Monitoring Student Understanding


As I was trying to figure out what I wanted to do for this month's Bright Idea post, I came across this simple and effective tool in the fourth grade teachers' classrooms.

Each student has a small ring of three cards as pictured. As students are working, they self-monitor and flip to the card that describes their level of needed assistance from the teacher. The rings stay on top of their desks so the teacher can quickly glance to see who needs immediate help and who can wait a bit.


If you enjoyed this bright idea, please consider joining me on {Facebook}, {Pinterest}, or view {previous Bright Ideas} for more great ideas.


Use color-coded cards to monitor your students' understanding

For more bright ideas from many more bloggers, please browse through the ideas below and choose a topic/grade level that interests you. Thanks for visiting!


Tried It Tuesday - Book Madness


Anyone who has followed me for any length of time knows that I'm crazy about March Madness. So when I saw {The Brown Bag Teacher's book tournament}, I knew that I had to do it this year.

I decided to have the kids nominate books and then take the top 16 vote getters. I also wanted to include the other fifth grade classes in my building. I created a Google form where I simply ask them to fill in their favorite 5-10 books.


I quickly discovered that this way of collecting the nominations would be a problem. First of all, kids couldn't spell the book titles so that a search wouldn't pick up all of the votes. Which meant that I had to tally them by hand. Also, some kids typed in series of books, while others typed specific titles within the series.


When I do this next year, I'm going to use titles of books from their reading journals and put checkboxes in front of them. Then they can check up to ten of the boxes. Or, if you have a better idea, please comment with it!

After figuring out the top 16, I seeded them. I wanted to seed them so that the favorites wouldn't meet until later in the tournament. If you use 16 books, number them from 1 to 16, with 1 being the top vote-getter and 16 being the low vote-getter. Then create your bracket like this, putting the books with their corresponding numbers.


Then I created the hallway display with the matchups.


Your display will depend on your wall space. To give you an idea, each one of those horizontal black construction paper strips in the very middle are 1" wide and 12" long. I used construction paper, but Catherine used black tape. I found the book covers online, but you could also photocopy them. I put the dates of the Friday deadlines at the top of each round.

After revealing the matchups, I gave the students a little over a week to start reading anything they wanted/needed to read in order to vote.

I created another Google form for the first round of matchups. I shortened the URL using bitly so that it would be easy for students to type into the browser. I sent out the link to the classroom teachers on Wednesday so that voting was in by Friday noon. I said that if they haven't read either of the books in the matchup, they didn't have to vote in that pairing.


These results were much easier to tabulate. On my hallway display, I put a sticky note with the number of votes received on each book. This way, they could see the "final score" of each matchup. Since I do this during recess on Friday, there is much cheering and such when they come in from outside.

Then it was simply creating a new form with the new matchups to be voted on by the following Friday.

Find out what others have tried this week by checking out Holly's linky!